
When we started the development of our nifty little game, procedural generation was slowly starting to become popular in the context of games. Now, way too many years later, procedural generation is a regularly used technique to generate content (most commonly levels) for all sorts of games. Still, few games we’ve seen have employed this technique for as many aspects of a game as we are trying to do. In this post, we want to share some of the things we learned along the way and look forward to what’s left to do to finally complete this project.
The levels
Levels are, as already discussed, the most commonly found generated aspect of games. This does not mean however, that generating (playable) levels automatically is easy to do. We went through quite some iterations of level generation techniques until we found one which worked for us. Here a brief list of the things we did in the past:
- Random room placement:
The first iteration of the level generator would randomly place rooms in an area of sufficient size. Some of the rooms were intended for special purposes, such as spawn-point, level-exit, item-room, etc., which would be rather small while other rooms were destined to contain lots of enemies and therefore had to be large. The only check it would perform at this point was that there was no overlap between the rooms. Every room had a pre-defined number of doors (depending on the pre-determined function of the room) which would lead to other rooms. After the rooms were placed, the generator would connect the rooms, ensuring that all rooms were connected to each other and that corridors would not overlap. This was done using a variant of the A*-algorithm with a special heuristic. While this worked reasonably well and offered some flexibility for parameterization of the room properties, it resulted in long corridors connecting the rooms. This might be interesting for certain types of games but since all the action in this game would happen inside the rooms, corridors were boring so having many long ones was not a good thing. We tried various things to reduce the overall corridor length and while successful to a certain degree we never were happy with the results inherently limited by the approach. - Constraint satisfaction:
Constraint Satisfaction Problems are a type of problem commonly found in the area of artificial intelligence (not the type of AI found in games though), in operations research and logistics. The idea is that you would list all the constraints which a solution to your problem would need to fulfill and let the solver come up with a solution. In our case, constraints would be things like- ‘there needs to be X rooms in this level’
- ‘every room needs to be reachable form every other room’
- ‘rooms can not overlap’
- ‘a room needs to be at least A units wide and B units high’
- ‘there must be exactly one spawn point’
- ‘there must be exactly one end point’
- ‘start-room and end-room can not be neighbors’
- ‘some rooms need to have more than two entries’ (on order to avoid that the level ends up being a chain of rooms)
- ‘the end room needs exactly one entry’
- …
The list goes on and on. The beauty of this approach is that it is extremely flexible. Once you managed to write down all your rules you can just lean back and let the machine do the rest. There is only one problem: CSP’s are hard, NP-hard. Even if you can guarantee that there is a solution to your problem, there is not necessarily an easy way to find one. While there are (somewhat) efficient ways to overcome these issues, early experiments showed that it is not feasible to generate levels this way (at least not while the player is waiting for the generation to complete) and while this approach might be interesting for, let’s say a puzzle game where you could generate the levels this way (to ensure their solvability) in an off-line fashion and distribute them to the players later, it is completely unusable for the type of game we are trying to make.
- Room Job assignment:
What we ended up with in thefinalcurrent version of the game is a bit of a compromise between the two previous approaches. The main difference between this and the previous methods is that not all constraints are considered at the beginning but processed at a later stage in a best-effort kind of way. (The technical term for this is ‘constraint relaxation’.) We would fist generate rooms and place them in a roughly grid-like pattern. Each room has a maximum on how much space it is allowed to take up, when a new room is placed next to an existing one it will take try and take up as much space as it can without surpassing this maximum or intersecting with other rooms. Once all rooms are placed this way, they get assigned jobs. Instead of defining hard constraints, each ‘Room-Job’ has a metric by which it evaluates all the as of yet unassigned rooms and picks the best (or at least the least bad) room for the job. Room jobs are prioritized such that start- and end rooms are chosen first in order to avoid constraint violation.
While this method is not guaranteed to produce the best possible levels, it always produces levels which are playable. It also has the advantage that it is fast. In fact. it is even faster than the first method described here while consistently producing superior results.
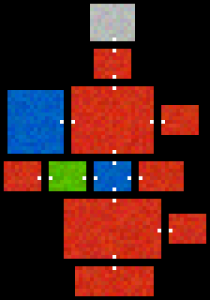
Layout of a level: start and end rooms are marked in blue, item rooms in green and trap rooms in grey.
These were not all the things we tried over the years but they were the most relevant. Now that we have a basic level, we need to fill it with stuff.
The enemies: looks
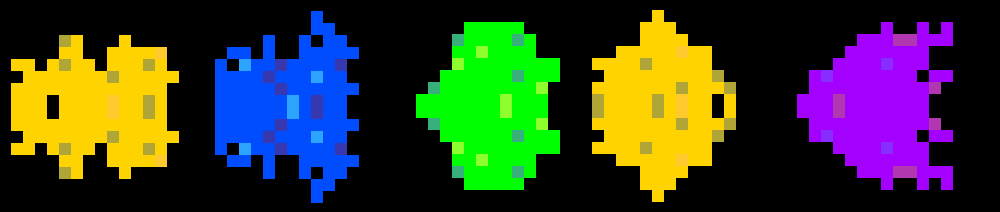
Early versions of the game had hand crafted enemies. While we were trying to figure out in what direction we wanted to go with the game, it became clear that this would not do. So we had to come up with a way to generate enemy sprites which were consistent with the overall ascetic of the game, sufficiently different from each other and still immediately recognizable as enemies. This turned out to be easier than expected. We wrote a blog post about the method a while back which goes into more detail but here is the gist of it:
- Choose a base color
- Set a seed point in the middle of the sprite
- While not enough pixels set do:
- Randomly select a pixel that’s next to a set pixel
- Compute probability for setting this pixel
- Set the pixel using the probability from 2.B
- Set a second pixel in order to assure symmetry
- Choose a highlight color given the base color
- While not enough highlights are set do:
- Select a non highlighted (base colored) pixel by random
- Highlight the pixel
- Highlight a second pixel in order to assure symmetry
- Generate 3d model from sprite
The results look something like this:


The enemies: behavior
Having enemies look different from one another is one thing, having them behave differently is an entirely different problem. We wanted the enemies not only to start out with a different behavior but also have their behavior change over time and ideally adapt it to the actions of the player. In order to accomplish this, we turned the entire game into an evolutionary optimization problem.
Each enemy has a species which has certain characteristics. These characteristics are encoded in a data structure we call the genome, loosely analogous to what happens in biology. The reason we have the ‘genome’ on species level rather than on the level of an individual is that enemies of the same species share all their properties with the only exception of their highlighting pattern as described above. Each genome has genes (obviously) which are grouped into segments. Each segment controls a different aspect of the overall behavior of the species. These segments contain (among others):
- Type: if the enemy is one entity or a swarm
- Color: the color palette containing base and highlight colors
- Health
- Size
- Level of detail: how many voxels are used in the model of the enemy given its size
- Speed
- Movement: what strategy it employs to get around
- Target selection: how it selects when and what to attack
- Aiming: the strategy describing where to aim and when to fire
- Weapon
- Shot mod: what modifiers to add to a shot
- Drop: what to drop when killed
To explain how the genes are implemented it is easiest to have a look at the code:
1 2 3 4 5 6 7 8 9 10 11 12 13 14 15 16 17 18 19 20 21 22 23 24 25 26 27 28 29 30 31 32 33 34 35 36 37 38 39 40 41 42 43 44 45 46 | public abstract class Gene { protected final Genome genome; protected final GenomeSegment segment; protected final TObjectFloatHashMap spawnList = new TObjectFloatHashMap(); protected Gene(Genome genome, GenomeSegment segment){ this.genome = genome; this.segment = segment; this.genome.addGene(this.segment, this); } void mutate(Random random){ changeSettings(random); spawnNewGenes(random); } /** * 'mutates' the gene * @param random */ protected abstract void changeSettings(Random random); /** * generates an identical copy of this gene and adds it to the specified genome * @param genome * @return */ protected abstract Gene clone(Genome genome); protected final void spawnNewGenes(Random random){ for(GeneFactory factory : this.spawnList.keySet()){ if(this.spawnList.get(factory) >= random.nextFloat()){ factory.createNew(this.genome); } } } /** * Used in the fitness function to favor more interesting constellations. * Returned values should be between 0 and 1. * @return */ protected abstract float getInterestingness(); } |
Let’s look at this in some more detail. The most relevant method from an evolutionary process type of view is the one called ‘mutate’ which calls the abstract method ‘changeSettings’ and the already implemented method ‘spawnNewGenes’. The changeSettings method stays true to the basic idea of evolutionary processes by changing what the gene does ever so slightly. This might result in a small change in properties such as size, speed, color and the like. What these properties all have in common is that they can be expressed as numerical values. This does not however work for behavioral logic blocks such as those controlling movement, aiming and the like. To achieve variability there we use the second method. The ‘spawnNewGenes’ is rather atypical for an evolutionary optimizer as it does not change a gene but adds new ones to the genome. To better understand how this process works it is important to know that there are two fundamentally different types of genes in this simulation, dominant genes and combinable genes. The dominant genes are used on segments where it not clear what a combination of multiple genes would look like. These control, or rather select the logic blocks responsible for the previously discussed behaviors. Dominant genes have each have a method with which dominance in a certain segment can be determined. Once a dominant gene is found in a segment, all other genes are muted. They are still there but don’t have an active effect. We will come back to this later to see why it is relevant. In contrast to the dominant genes, we have the combinable genes. All the combinable genes in a segment work together to determine the final properties of this segment. There might for example be gene which sets the size to a value of let’s say 10, another one which has a +1 effect on size and one which has a +10% effect which would for this example result in a size of roughly 12. But back to ‘spawnNewGenes’. In every generation (which in our case is one per level), a gene has a chance of adding additional genes to the genome. This is important to transition from one dominant gene to another but can also be used to generate more drastic changes in areas controlled by combinable genes. But there is not only the addition of new genes. To simulate that a random mutation might destroy a gene, there is a small chance that with every transition from one generation to the next, a gene might be dropped from the genome. The effect of this is most noticeable when the dropped gene has been the dominant one for its segment. This is also why all the other genes of a segment are kept even if they have been muted. There might be a situation where they become activated again. Extra checks are in place to assure that every segment has at least one active gene in order for the species to be functional. This is another thing which does not happen in biology. But since we want the game to remain being playable we have no other option than to constrain the simulation in certain ways. An additional limitation we imposed comes in the form of what we called ‘interestingness’. There are certain perfectly correct combinations of genes which result in a utterly boring and borderline game-breaking species. While the combination of a long-ranged attack with a ‘no-movement’ behavior might be interesting and a melee attack paired with a swift and sneaky movement might be interesting as well, the combination of melee and sitting still is certainly not. It is the interesingness’s job to if not entirely prevent such situations (there is a lot of random going on after all) at least greatly reduce the probability of their occurrence.
There is one more important aspect of this process which we have not yet discussed so far and this is the so called fitness function. Since evolution is all about the survival of the fittest, meaning the individual (or in our case species) which is best adapted to its environment has the highest chances of survival. This means we need a way to evaluate/estimate the fitness of a species relative to another one. The easiest way to do this would be just to see what is left after the player leaves a level and go from there. There is one major disadvantage with this approach though. Imagine there are two species in a level. One of them just happens to be between the spawn-point and the level exit while the other one is in a part of the level which the player does not necessarily need to visit. Even though the first could be the stronger one or the more interesting one, there will necessarily be fewer of them around once the player goes through. This is why we use a different metric: player interaction. Species score higher the more they interact with the player. They get rewarded for inflicting damage on the player and are penalized (though to a much smaller degree) for taking damage. This has the effect that species which interact with the player a lot thrive while those which do not wither away. To limit the possibilities for the player to drive a species to extinction by simply ignoring it (though this is a valid strategy), individuals are randomly distributed through out the level which makes it more difficult to avoid them deliberately. Doors, delayed spawns and similar mechanics further help to make species avoidance more difficult.
While using such evolutionary processes for entity generation offers a wide range of possibilities, it is important to keep one thing in mind: nature is messy and unpredictable and therefore must any process which tries to simulate it be messy and unpredictable as well, at least to a certain degree. There are countless ways to tune parameters and introduce constrains to guide the process into a rough direction, some of which we discussed here but there are no guaranteed outcomes. This is however kind of the point of this whole exercise since if you wanted per-determined outcomes you could just go ahead and pre-determine them. Getting this process right (which we do by no means claim we have) or at least working (which we want to believe we have) is incredibly time consuming and tedious. The results of such a process might surprise you as they are more often than not different from the initial expectations.

The transition graph showing which weapon genes can spawn which.
Items and Power-ups
As with genes, (and also for the exact same reason) we have two different types of power-ups; the ones modifying (only) stats and the ones modifying abilities (and also stats, because, why not). The first type is dropped by all enemies when they are destroyed and is dependent on their genetic composition. Stronger enemies will drop items which will (slightly) increase the players strength while the drops of especially quick enemies will increase the players speed and so on. These drops are designed in a way that they all have positive influences on several metrics of the player but are most prominent in one. Enemies might, depending on the genes in the ‘drop’ segment of their genome also drop additional power-ups with constant effects such as a +1 health with a certain probability. The player might then try to keep this species alive for as many levels as possible since they can be ‘farmed’ to a certain degree which could have significant positive impacts on the players chances of beating the game.
The other type of power-up is the one which has an effect on the players abilities. They are not spawned by enemies but rather are scattered throughout the game, in most cases there is one per level. To preserve symmetry, these abilities (with very few exceptions) are designed in a way that they work for both the player and the enemies. This has the consequence that every special ability the player encounters when being attacked by an enemy will be available to the player via a power-up eventually. Placement of these power-ups is entirely random with the only constraint that no power-up may be spawned more than once per run.
The inherent randomness of this approach necessitates that the effect of these power-ups, especially the ones with additional abilities, cannot be large in order to avoid the situation where a certain constellation of abilities results in a disproportionally strong species of enemies early in the game. While such combinations exist, we designed the ‘mutation-rate’ in enemies vs the spawn-rate of power-ups available to the player in such a way that it is way more (but still not very) likely for the player to have such a combination than it is for an enemy to ‘evolve’ one.
Visual and Sound effects
A big part of the ‘lore’ of the game, if you want to go so far as to call it that, is conveyed through visual effects which are for the most part realized using a chain of post-processing shaders. These shaders are very simple units which perform either local or global transformations on the rendered image before it is displayed. Implementing the pipeline in this way gives us quite some flexibility for varying the parameters of these transformations (each shader has at least one parameter) which can result in a wide range of different effects. A piece of logic called the ‘ShaderProgression’ takes care of the management of these parameters and changes them according to the player’s progress within the game as well as a fair bit of random supplied by the same random number generator which also influenced the level and the enemy development. A downside of having many configurable modules instead of just one is that, similar to the power-ups, each individual effect has to be somewhat small as not to overpower the whole chain rendering (quite literally in this case) the game unplayable. This also puts an upper-bound on the fanciness which cannot be hand-crafted to an artists visions but have to remain small and compatible. Another disadvantage of this modular chaining is that it’s execution requires quite a bit of pixel fill rate. While this is no problem for modern desktop machines (even ones designed for office work and the like) it turned out to be too taxing for smaller/mobile devices which lead us to drop the support for Android/OUYA which was originally one of the reasons why we built our custom engine.
For the sound design, the original idea was to have a soundtrack comprised of a few base themes each of which would have several extending instrumental tracks which could be layered on top depending on the state of the game to create a dynamic sound experience which would be (somewhat) unique on every play-through. This idea had to be abandoned due to several factors, including not only time- but also technical constraints. The audio components of our engine are not able to provide the accuracy of synchronization and the filter chain necessary to make this work and implementing this kind of logic would have been extremely time consuming and not worth the effort at this point. I still hope to be able to do something like this one day but with an engine which does not have to be built from scratch first. What we now have in terms of audio is quite different. Instead of a soundtrack we opted to have only a sound-scape comprised of between one and three layers of atmospheric background tracks which are selected in every level based on the state of the game.
Things to come
Now that all components of the game are in place, the only thing left to do (aside from some polishing and bug-fixing) is balancing. As already described in here, with this type of game it is pretty much impossible to ensure that every run will be a well balanced experience, at least not without ruining the ‘something slightly different every time’ aspect of the procedural generated world. This goes somewhat against the concept of ‘flow’ which would require a precisely-ish controlled difficulty curve. Something we can do however is tweak the difficulty curve of the average run. To do this, we record certain key indicators throughout game such as speed, health, damage, etc. for both player and enemies and aggregate them over many runs. If the divergence of the values between player and enemies becomes too large at a certain point, changes to the mutation logic which governs enemy development can be made in order to (try to) mediate the problem. This again is a quite time consuming process about which we will certainly have to say some things in the far future, so stay tuned…

 High health: big, low detail
 High speed: small, high detail
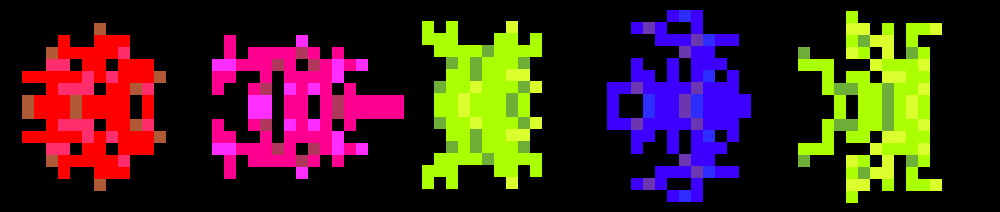 High power: medium size, high detail, more light/dark spots